
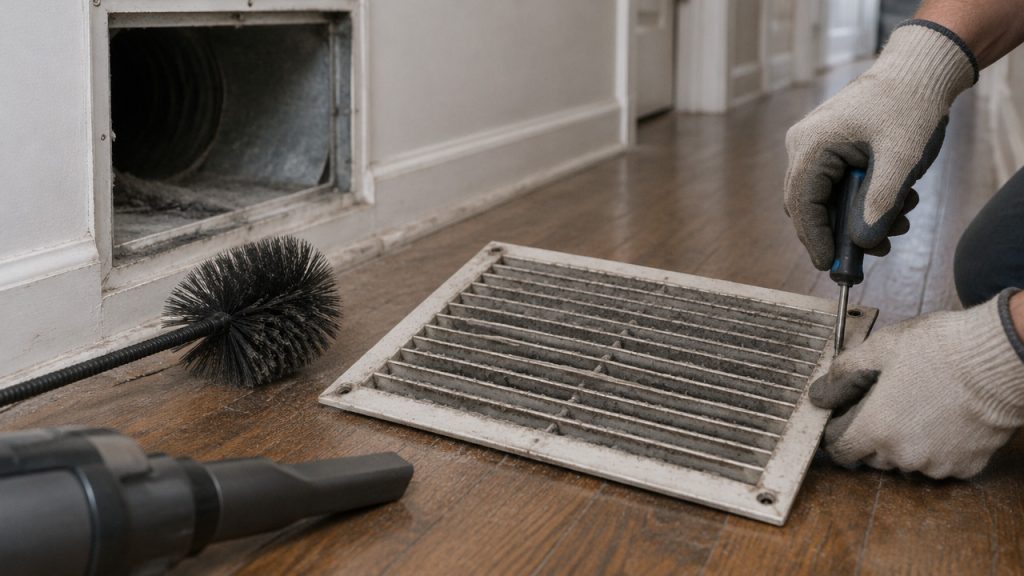
To clean air ducts DIY, shut off your HVAC, seal the registers, pull the vent covers, agitate the accessible duct walls with a soft brush, and capture the loosened debris with a HEPA-filtered vacuum. Then wash the covers and swap the filter. It is a satisfying weekend project that clears the dust you can actually reach. Here is the honest part: it only covers the first few feet. We’ll show you what to do, what to skip, and when Central Texas heat and mold make calling a pro the smarter move.
The Quick Answer: Seven Steps, One HEPA Vacuum, and Honest Expectations
If you are wondering can I do duct cleaning myself, the short answer is yes but with a big asterisk. You can absolutely handle the visible portions of your system with basic tools and a Saturday afternoon. A proper DIY job clears dust from registers, returns, and the first few feet of ductwork. It improves airflow at the vents and gives you peace of mind. Just know that without professional-grade negative pressure equipment, you are cleaning the edges, not the deep trunk lines. Here is the straightforward seven-step process for a homeowner-level clean.
- Shut down your HVAC system completely at the thermostat and breaker for safety.
- Seal all supply registers with plastic wrap or paper towels to create negative pressure.
- Remove vent covers and return air grilles by unscrewing them from the wall or floor.
- Wash the covers in warm, soapy water and let them dry completely while you work.
- Agitate dust inside the accessible duct mouths using a soft-bristle brush on a rod.
- Vacuum the loosened debris with a HEPA-filtered shop vacuum to prevent recirculation.
- Swap your HVAC filter for a fresh one before resealing and turning the system back on.
Before You Touch a Screwdriver: The Inspection That Decides DIY or Pro
Before you haul out the toolbox, grab a flashlight and your smartphone. You need to know what is hiding inside your ducts before you stir it up. A quick visual inspection of your return air grilles and supply registers tells you whether this is a simple dust job or something that requires professional intervention. For Austin homeowners, this step is non-negotiable. Lower humidity in winter can leave dust dry and loose, while our humid summers can turn duct interiors into mold-friendly environments. If you spot visible mold, pest evidence, or substantial moisture, stop immediately. signs your air ducts need cleaning go beyond simple dust buildup, and ignoring them can compromise your home’s indoor air quality.
Here are the specific red flags to look for during your inspection. Each finding dictates your next move:
- Light gray dust on vent louvers DIY-safe: standard household dust, brush and vacuum approach works.
- Black streaks around register edges DIY-safe: usually soot or outdoor pollution, wipe clean and monitor.
- Visible mold growth (green, black, fuzzy) Stop and call: suspected mold requires proper remediation per EPA guidance.
- Pest droppings or nesting material Stop and call: indicates infestation, needs professional removal and sealing.
- Moisture or water stains inside ducts Stop and call: moisture source must be identified and fixed before cleaning.
- Excessive debris blocking airflow Stop and call: deep blockages beyond reach need professional-grade vacuum equipment.
The Austin-Proof Toolkit: Gear That Works and Gear That Just Moves Dust Around
Not all cleaning gear is created equal. If you use the wrong tools, you will just broadcast dust particles back into your living room instead of capturing them. The non-negotiable item here is a HEPA-filtered vacuum. Standard shop vacuums and household vacuums without HEPA filtration exhaust fine particles back into the air the same particles that aggravate allergies and settle on your furniture. In 2026, filter technology has improved, and true HEPA ratings capture 99.97% of particles down to 0.3 microns. Austin homeowners should also consider the heat: working in an attic or near the air handler means breathable protection is essential. homeowner’s guide to effective duct cleaning always starts with the right safety gear, including a proper N95 mask or respirator.
| Tool | Purpose | Verdict | Approx. Cost |
|---|---|---|---|
| HEPA Shop Vacuum | Captures fine dust without recirculating particles into the air. | Buy (essential) | $150–$400 |
| Soft-Bristle Brush | Agitates dust on duct walls without damaging flexible duct material. | Buy | $10–$25 |
| N95 Respirator Mask | Protects lungs from stirred dust, mold spores, and allergens. | Buy (essential) | $15–$30 |
| Microfiber Cloths | Wipes down vent covers and captures dust from surfaces. | Buy | $10–$15 |
| Feather Duster | Moves dust from surfaces but launches particles into the air. | Skip | N/A |
| Non-HEPA Vacuum | Exhausts fine dust back into living spaces through the outlet. | Skip | N/A |
| Extension Rods | Reaches deeper into visible duct runs for limited agitation. | Buy (optional) | $20–$40 |
| Paper Towels & Tape | Seals registers temporarily to maintain negative pressure. | Buy | $5–$10 |
Step-by-Step: Cleaning Registers, Return Vents, and Reachable Duct Runs
Now for the hands-on part. This is where preparation meets execution. Follow this sequence carefully cleaning top-down ensures you are not knocking dust onto surfaces you have already wiped. Start with your return air vents, which are usually the dustiest part of the system since they pull air from your living space. Then move to supply registers. Finally, clean near the air handler if you have safe access. The goal is to remove the accumulated dust bunnies and debris from the areas you can reach without overextending yourself or damaging flex duct material. deep cleaning your air ducts follows a logical order that prevents cross-contamination between sections.
- Turn off your HVAC system at the thermostat, then flip the breaker switch at your electrical panel.
- Remove the paper towels or tape you used to seal the supply registers during your pressure setup.
- Unscrew return air grilles first these collect the heaviest dust and should be cleaned before supply vents.
- Wash all vent covers in a utility sink or outdoors with warm water and mild detergent, then set aside to dry.
- Attach a brush attachment to your HEPA vacuum hose and gently sweep the first 2–3 feet of the return opening.
- Insert a soft-bristle brush on a rod and lightly agitate the duct walls to loosen caked-on dust and cobwebs.
- Vacuum immediately after brushing work quickly so the disturbed dust does not settle deeper into the system.
- Repeat the brush-and-vacuum process for each supply register, working room by room.
- Wipe down the exterior of the vent boots and the surrounding wall or floor area with a microfiber cloth.
- Replace the vent covers, screw them in snugly, and install a brand-new HVAC filter before restoring power.
Safety Note: Never reach your arm further than you can clearly see. If you encounter flex duct the flexible, ribbed tubing common in Central Texas homes avoid pressing hard or using stiff brushes, as the material tears easily and creates expensive air leaks.
Where DIY Hits a Wall: Mold, Flex Duct, and Attic Runs in Central Texas Heat
There comes a point in every DIY project where you assess the risk versus reward. For Austin homeowners, that calculus shifts dramatically when you encounter Central Texas heat, humidity, and the unique challenges of attic ductwork. DIY methods work beautifully for accessible, visible components. They fail sometimes dangerously when applied to systems contaminated with mold, pest debris, or deep trunk-line buildup. The reality is that household tools cannot match the negative pressure and agitation power of professional-grade equipment. More importantly, certain conditions pose health risks to your family if you disturb them without proper containment. clean air ducts myself or hire a professional in Austin is not just a question of convenience it is a question of safety.
The Environmental Protection Agency offers clear guidance on this front. If you suspect mold growth, the EPA recommends that cleaning be done by professionals who can contain the affected area and use proper remediation techniques. Scrubbing mold with a household brush releases spores into your living space, potentially worsening the very problem you are trying to solve. Here are five specific situations where DIY is unsafe or simply ineffective:
- Visible mold growth inside ductwork or on the air handler components Scrubbing releases spores that spread through the HVAC system and into living spaces.
- Fiberglass-lined ductwork showing deterioration Damaged fiberglass releases airborne particles that irritate lungs and require professional sealing.
- Flexible ductwork in attic spaces The ribbed material traps debris deep in the grooves and tears easily under DIY agitation.
- Blockages deep in trunk lines beyond arm’s reach Household vacuums lack the suction power to extract compacted debris from main duct runs.
- Post-flooding or water damage scenarios Moisture intrusion into ductwork creates mold conditions that require professional-grade drying and remediation.
After the Dust Settles: What Changes for Allergies, Babies, and Your HVAC Bills
Once you have finished your DIY duct cleaning, what should you expect? Be realistic. You will see less dust on your vent covers. Airflow from your registers will likely feel stronger because the dust buildup at the openings is gone. Your new filter will stay cleaner longer because the system is not immediately pushing loose debris through it. For homeowners in Austin, where seasonal allergens like cedar pollen and ragweed are constant challenges, reducing the dust load in your HVAC system is a meaningful step toward better indoor air quality. However, air duct cleaning and indoor air quality are connected, but cleaning alone is not a cure-all. If someone in your household suffers from chronic allergies or respiratory issues, you should see an allergist for diagnosis and treatment. Duct cleaning is one tool in the toolbox, not a silver bullet.
| Indicator | Before DIY Cleaning | After DIY Cleaning |
|---|---|---|
| Airflow at registers | Weak, inconsistent, or Dust blows out when the system kicks on | Stronger, consistent airflow with no visible dust launch |
| Dust on vent louvers | Visible gray or black buildup on supply and return covers | Clean metal, no visible dust coating |
| Filter condition | Filters clog quickly, often within weeks of replacement | Filters last closer to the standard 90-day replacement interval |
| Visible dust on furniture | Frequent dusting required, film appears quickly | Dust settles more slowly, longer intervals between cleaning |
| Odors from vents | Musty or dusty smell when HVAC first turns on | Fresher air, no noticeable odor at startup |
Key Takeaways: Your DIY Duct Cleaning Cheat Sheet
Let us bring it all together. DIY vs professional air duct cleaning is not a binary choice it is about knowing where homeowner tools stop and where expert intervention starts. You can handle the accessible parts of your system with confidence. You can improve your indoor air quality and extend the life of your HVAC filter. But you should also recognize the warning signs that demand professional attention, especially in a climate as demanding as Central Texas.
- DIY duct cleaning covers registers, returns, and the first few feet of reachable ductwork.
- A HEPA-filtered vacuum is mandatory non-HEPA vacuums recirculate fine particles back into the air.
- Stop immediately if you see mold, pest droppings, moisture, or deep blockages call a professional instead.
- Austin homeowners should inspect ducts annually in 2026 before allergy season peaks in late winter and fall.
- Flexible ductwork and attic trunk lines are off-limits for DIY tools agitation risks tearing the material.
- Results include better airflow, cleaner registers, and longer filter life, but deep cleaning requires pro equipment.
FAQ: DIY Duct Cleaning Questions Austin Homeowners Actually Ask
How often should I clean my air ducts myself?
Yes, DIY cleaning every 12 to 24 months is reasonable for maintenance between professional services. Most manufacturers recommend full professional cleaning every 3 to 5 years, but you can handle touch-ups on visible components more frequently. If you have pets, allergies, or live in a high-pollen zone like Austin, an annual DIY inspection and light cleaning keeps dust loads manageable. Use your filter condition as a guide if your filter clogs within weeks, it is time to inspect.
Do I really need a HEPA vacuum, or will my regular vacuum work?
No, standard vacuums are not suitable for duct cleaning because they exhaust fine particles back into the air. HEPA filtration captures 99.97% of particles down to 0.3 microns, which is the size range that irritates lungs and triggers allergies. A non-HEPA vacuum basically operates as a dust launcher it pulls debris in and spits the finest, most harmful particles right back out through the exhaust. For a comprehensive guide to air duct cleaning, the HEPA vacuum is the one tool you should not skip.
How much does professional duct cleaning cost compared to DIY?
DIY costs between $200 and $500 in tools if you are starting from scratch, while professional service averages $450 to $1,000 depending on system size. If you already own a HEPA shop vacuum and basic tools, your out-of-pocket cost drops to under $50 for filters and cleaning supplies. The trade-off is labor and reach you spend a Saturday doing what a professional team finishes in two to four hours with vastly more powerful equipment.
Is DIY duct cleaning safe for homes with babies or family members with allergies?
Yes, provided you use a HEPA vacuum, wear an N95 mask, and stop if you encounter mold or pest debris. For households with infants or allergy sufferers, the goal is reducing airborne irritants, not stirring them up. Seal the registers before you begin, work with negative pressure in your favor, and ventilate the home thoroughly after you finish. If anyone in the home has respiratory conditions, consider scheduling during times when they can leave the house for a few hours.
When should I absolutely call a professional instead of doing it myself?
Call a professional immediately if you see visible mold, pest droppings, substantial moisture, or if your ducts are the flexible type in an attic space. These conditions exceed homeowner tools and can create health hazards if disturbed incorrectly. For Austin homes, the combination of summer humidity and attic heat creates ideal mold conditions in ductwork you cannot safely reach. Noble Air provides the deep cleaning and remediation services that DIY efforts simply cannot match.