Dryer vent cleaning is an essential process that every homeowner must undertake to ensure that their dryer functions optimally. A clogged dryer vent can lead to various problems, including fire hazards, reduced efficiency of the dryer, and increased energy bills. This article will delve into the process involved in dryer vent cleaning to help you understand what it entails and why it’s crucial.
Cleaning a dryer vent involves removing the lint and debris that accumulate inside the dryer ducts over time. The process aims at improving the airflow in the vents, reducing drying time, extending the lifespan of your machine, and preventing potential fire hazards.
While some homeowners may opt for a DIY approach, it’s advisable to hire a professional cleaner with experience in this area for optimal results. In the next section, we’ll go through some of the steps involved in this critical process.
Understanding the Importance of Dryer Vent Cleaning
The significance of dryer vent cleaning lies in its ability to prevent the potentially dangerous buildup of lint and debris.
When dryer vents are not regularly cleaned, lint can accumulate inside them, which can cause the dryer to overheat. This overheating can lead to a fire hazard that puts individuals and their homes at risk.
In fact, according to the National Fire Protection Association (NFPA), dryers and washing machines were involved in almost 17,000 home fires in 2010 alone.
In addition to preventing fires, regular dryer vent cleaning also improves the efficiency of your dryer.
When vents become clogged with lint and debris, air flow is restricted, causing the dryer to work harder than necessary. This not only wastes energy but also shortens the lifespan of your dryer by putting additional strain on its components.
Therefore, it’s essential for homeowners to have their dryer vents cleaned on a regular basis by experienced professionals who understand the technicalities involved in this process.
Steps Involved in Dryer Vent Cleaning
Dryer vent cleaning is a crucial maintenance task that involves several steps to ensure optimal performance and safety.
The first step in the process involves disconnecting the dryer from the power source and removing any debris or lint from the machine.
Next, technicians focus on cleaning the dryer duct and vent hood, which can accumulate significant amounts of lint over time.
Finally, outdoor vents are inspected and cleaned as needed to prevent clogs and improve ventilation.
These steps require technical expertise and attention to detail to maximize efficiency while minimizing potential hazards.
Disconnecting the Dryer
Like a skilled surgeon preparing for surgery, the first step in the process of dryer vent cleaning involves carefully disconnecting the appliance from its power source and exhaust duct. This is a crucial step as it ensures that no electricity is running through the dryer during the cleaning process and also prevents any damage to the exhaust duct.
The following steps are involved in disconnecting the dryer:
1. Turn off power supply: Before touching anything, ensure that you turn off the circuit breaker or unplug the dryer from its electrical outlet.
2. Pull out dryer: Carefully pull out your dryer away from its usual position so that you can reach and inspect both ends of your exhaust duct.
3. Disconnect hose: After pulling out your dryer, locate where your hose attaches to your wall unit or exterior vent hood and remove it by loosening any bolts or clamps.
4. Inspect for damages: With everything disconnected, inspect both ends of your exhaust duct for any visible damages such as holes, cracks or tears before proceeding with cleaning.
By following this detailed process for disconnecting a dryer, homeowners can ensure that their appliance is safe to work on while also allowing them to detect any potential issues before they become major problems.
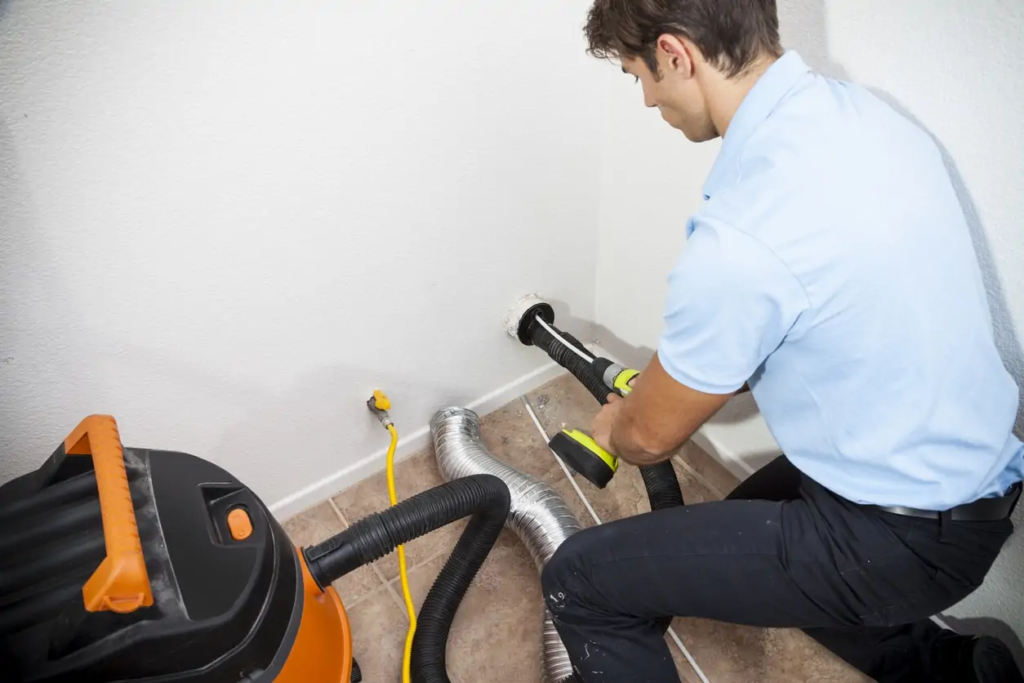
Cleaning the Dryer Duct and Vent Hood
Efficient maintenance of the exhaust duct and vent hood is crucial to ensure optimal performance and safety of the appliance. The cleaning process begins by gathering the necessary tools such as a vacuum cleaner with an extended hose, a brush kit, and a screwdriver.
After disconnecting the dryer, it is important to remove any debris or lint from the vent hood using a brush. It is also important to check for any damages or blockages in the vent hood.
Next, use the brush kit to clean out any lint or debris from inside the ductwork. This can be done by inserting the brush into one end of the ductwork while holding onto it at the other end and moving it back and forth. A vacuum cleaner can be used simultaneously to catch any debris that falls out during this process.
Finally, reattach all components properly before turning on your dryer again. By following these steps regularly, you will not only improve your dryer’s efficiency but also reduce potential fire hazards caused by clogged vents or ducts.
Overall, keeping your dryer’s vent hood and exhaust duct clean is essential in maintaining its optimal performance and safety standards. With proper knowledge and tools at hand, anyone can efficiently perform this task without needing professional help every time. So why not take charge of your appliance’s maintenance today?
Cleaning the Outdoor Vent
Maintaining a clean outdoor vent is crucial to ensure proper airflow and prevent potential fire hazards. Neglecting this part of the dryer vent cleaning process can lead to serious consequences, such as lint buildup that could eventually ignite and cause a fire.
To prevent this from happening, it is important to follow these steps when cleaning the outdoor vent:
– Inspect the exterior vent hood for any damage or debris buildup.
– Remove any visible debris, such as leaves or sticks, by using a brush or vacuum attachment.
– Use a special tool called a dryer vent brush to remove built-up lint inside the ductwork leading to the outdoor vent.
– Check for any blockages in the exhaust system and remove them promptly.
By following these steps during the cleaning process, you can ensure proper ventilation of your dryer’s exhaust system. This will not only reduce the risk of fire but also improve energy efficiency and extend your dryer’s lifespan.
It is recommended that you clean your outdoor vent at least once a year to maintain optimal performance.
How Often Should You Clean Your Dryer Vents?
Regularly removing lint from your dryer vents is crucial for maintaining the safety and efficiency of your dryer.
The frequency with which you should clean your dryer vents depends on several factors, including how often you use your dryer, the length of the venting system, and the type of material used to construct it.
As a general rule of thumb, experts recommend cleaning your dryer vents at least once a year.
However, if you use your dryer frequently or have a long venting system that runs through multiple floors or bends in different directions, it may be necessary to clean it more frequently.
Neglecting to clean your dryer vents regularly can lead to a build-up of lint and other debris that restricts airflow and increases fire risk.
It’s important to pay attention to warning signs such as longer drying times or overheated laundry rooms, as these could indicate a clogged vent that needs immediate attention.
By staying vigilant about cleaning your dryer vents, you can ensure optimal performance and safety for years to come.
READ MORE:
Can You Clean Your Dryer Vent Yourself, Or Should You Hire A Professional?